This app works on both ARM and Intel Macs but only on MacOS Ventura. Please note: You may need to turn on port forwarding for port 1194 on the router for OpenVPN.
Step 1. Setting Up the OpenVPN Server
There are two panels — Server and Client. You use the same app to set up both the OpenVPN server and the OpenVPN client on the Mac.
Note: Unlike using VPN Enabler for Mojave (which works simply with Apple’s built-in VPN client in Network Preferences), you need an app to set up the OpenVPN client.
The OpenVPN Enabler app also offers an easy-to-use user interface to configure the powerful Mac OS firewall.
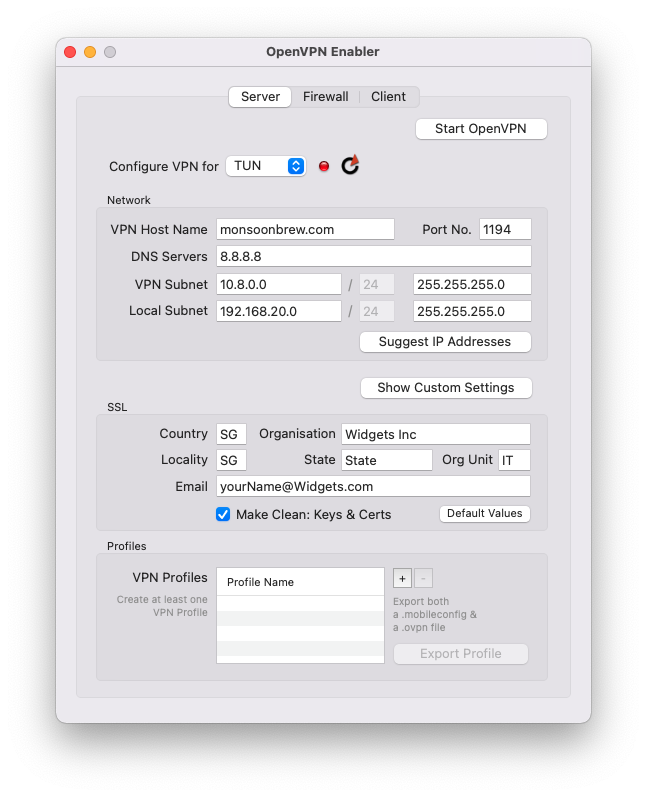
Enter the Domain Name (VPN Host Name field) of the machine you want to run OpenVPN Enabler on. That Domain Name must be publicly accessible from the Internet. Then, click on the Suggest IP Addresses button. Make any custom changes to those IP address fields, if necessary. Finally, click on the Start OpenVPN button, and that’s it. You have the OpenVPN Server running on your Mac.
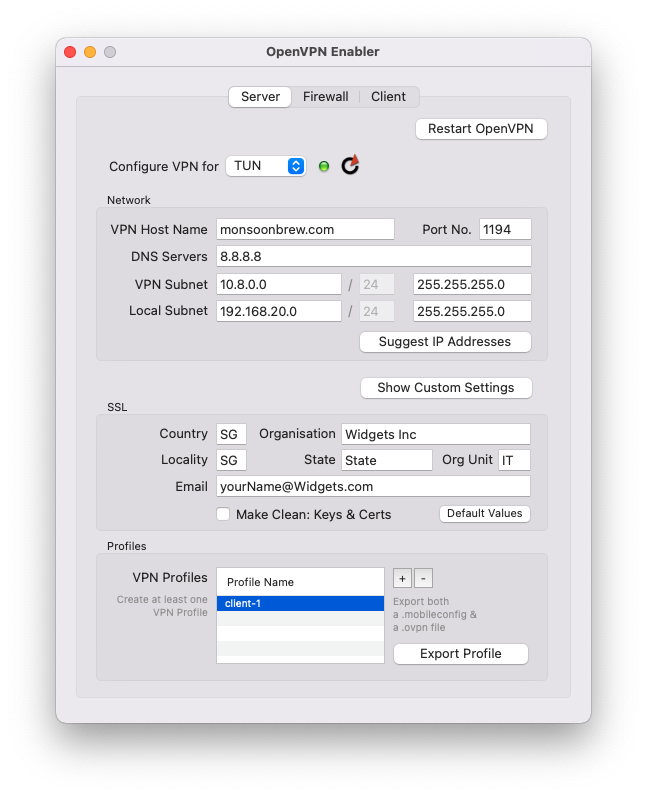
Step 2. After Starting the Server
After you hit the Start OpenVPN button, you will see that a profile called "client-1" is automatically generated. You use this profile to set up the OpenVPN client.
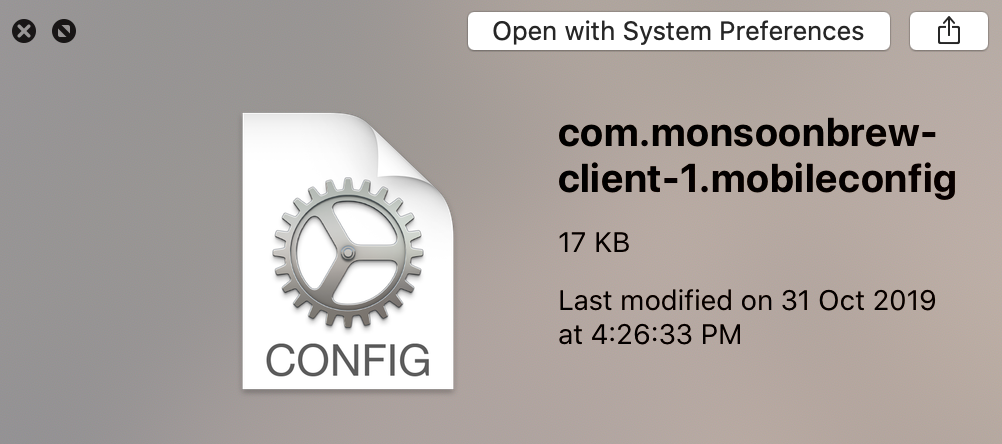
Step 3. Exporting the Profile
Export this profile (click on its name and the button will be enabled) and copy it to the OpenVPN client to set up the client-server connection. You can use the same profile for any number of clients (not so secure but we start with this because it’s simpler).
After you’ve hit the Export Profile button, look for this file, wherever you have saved it :
Copy this profile to the Mac or iOS device, either through AirDrop or through email or any other means.
Note: OpenVPN Enabler is also able to export a .ovpn file, next to the .mobileconfig file, in the selected directory. You can use this .ovpn file with any other OpenVPN client.
Step 4. Setting up the Client
a. If the client is an iOS device — except for one extra step, connecting to an OpenVPN Server from an iOS device is almost like what we did with the old Mojave Apple built-in VPN Server. Copy the above profile to the iOS device and install it in Settings. The extra step is that we need an app on the iOS device. For iOS, I didn’t write an OpenVPN client app because the one provided by OpenVPN suffices. Download it from their website. (https://apps.apple.com/us/app/openvpn-connect/id590379981) You don’t even need to open it or look at it. You just need to have it sitting on your iOS device. You launch the mobileconfig profile the usual way, by launching it from Settings or hitting the VPN button in Settings. Then watch if the VPN button shows it’s connected. (Hopefully).
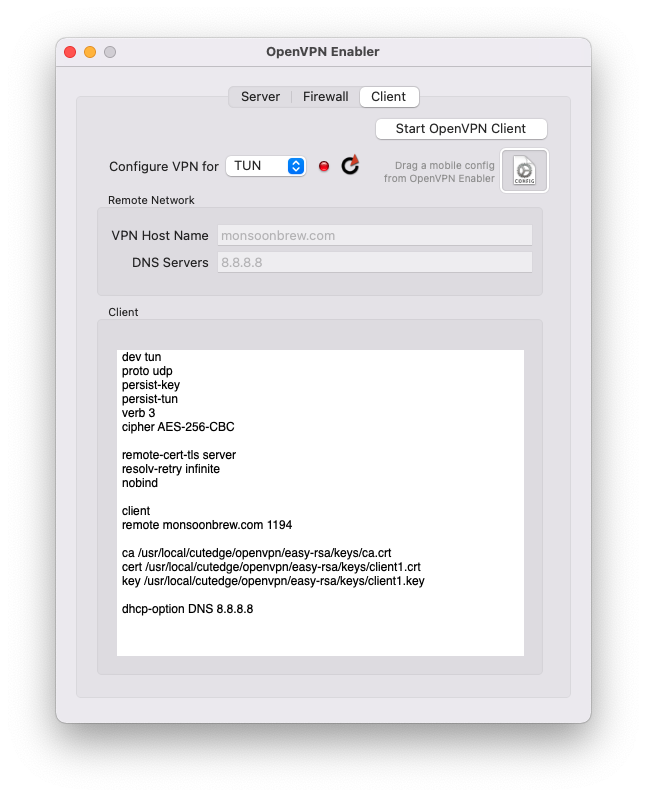
b. If the client is a Mac — now we need an app. The OpenVPN app for MacOS is very Windows-centric. And so I wrote a Mac OpenVPN client and merge it in the same app as the one that enables the Server. Use the same OpenVPN Enabler app in the targetted client Mac, but use the Client tab. Drag the exported mobileconfig file onto a “well” just below the Start OpenVPN Client button.Once the file is dropped on the well, the OpenVPN Client app will extract the client parameters from the profile and set up the VPN client config. Then you’re ready to hit the Start OpenVPN Client button.
Once it is started, the VPN light turns from red to green.
Step 5. Testing the Client
Use Safari. Load the website : “http://checkip.dyndns.com”.
Without the VPN turned on, it will show your “true” IP address — the network your Mac or iOS device is connecetd to. But with the VPN turned on, it will show the IP address of the OpenVPN Server. So on both the OpenVPN Server mchine and on the client, you do the same thing : load checkip.dyndns.com. Compare the IP addresses returned – if they are the same, then you’ve successfully connected back to your VPN.
You can also try pinging other machines on your local network, where your VPN Server is. You ping using the local private IP addresses the VPN Server is on. (I can reach other machines on my remote local network via their IP addresses, and I can log in to them via File Sharing and do ssh, etc, but I can’t reach my VPN server machine by its local IP address. I can only reach it by the virtual 10.8.0.1 address that the VPN sets up.
Firewall
The Mac OS built-in Packet Filter Firewall is turned on when the VPN Server is on. This is very useful.
For example, while looking through your Apache web server logs, you might see your web server getting hit with suspicious activity from a certain IP address. Create a new record in the Other Threats list, as shown below. Then, enter that IP Address and "80, 443" as the Port Numbers. Then click Save to Firewall. That IP address will be blocked immediately. You can verify this with an IP address that you own — for example, that occupied by your iPhone (check your IP address with the http://checkip.dyndns.com site).
Remove the block by deleting its record and clicking Save to Firewall again.
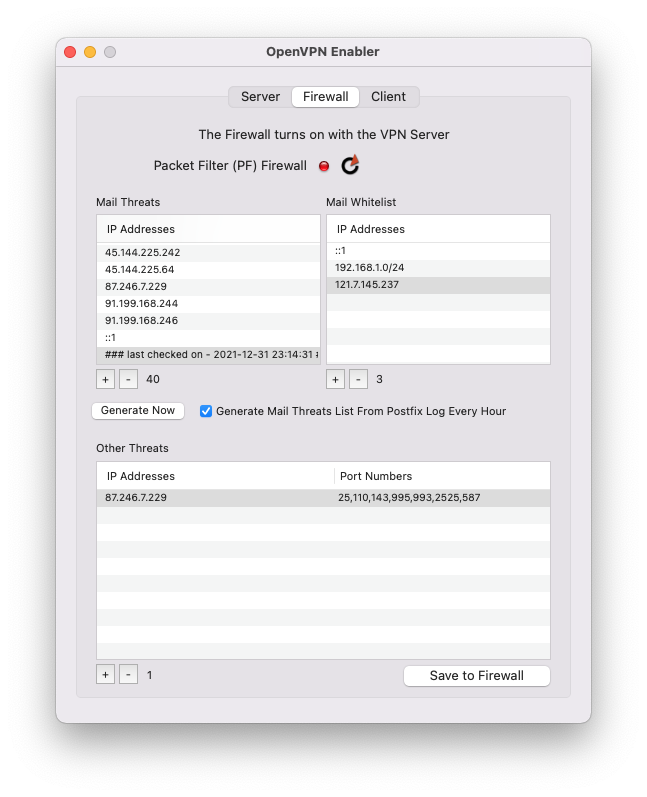
As a demonstration of the power of having control over your own firewall, the Mail Threats list is generated by scanning /var/log/postfix.log for repeated failed SASL LOGINs and grabbing their source IP addresses. You can run a job to scan and protect your mail server automatically, every half hour, or you can generate that list at any time. Also, you can add manual entries to it. Then update the list to the firewall. If you’ve seen the Postfix log before you did this, you’ll see the end of repeated login chatter.
The OpenVPN Enabler firewall UI includes a whitelist. If legitimate mail users are logged out of the system because they entered a wrong password (and thus were flagged wrongly as being would-be spammers), you can whitelist the IP addresses they’re logging on from. The whitelist contains, as defaults, localhost (::1), the IP address range of the private local network, and the server’s external public IP address (which can change from the initial setting if your server runs from a dynamically changing public IP address, so be aware).
This concept can be extended to the auto-scanning of attacks on web server, name server, and remote login ports, in future versions.
De-Installing OpenVPN Enabler
You can un-install OpenVPN Enabler by using the last menu item in the Help menu. It will shut down the OpenVPN daemon, if it is running, and remove all files installed by OpenVPN Enabler (in /usr/local/cutedge/openvpn).
To stop the VPN Server without un-installing, Option-click on the Restart VPN button.
Release Log
4.0 September 25th 2022. OpenVPN Enabler for Ventura released. The OpenVPN version is 2.5.7.


The serial number & download link will be displayed in the browser after payment, and will also be sent via email.
Download
OpenVPN Enabler for Ventura
Please provide the email address you used to purchase the product, together with its serial no:
The latest version is 4.0
This is a Universal "fat binary”, with both ARM and Intel “slices”.
Please check out the Release Log
Contact
Bernard Teo