|
|||
|
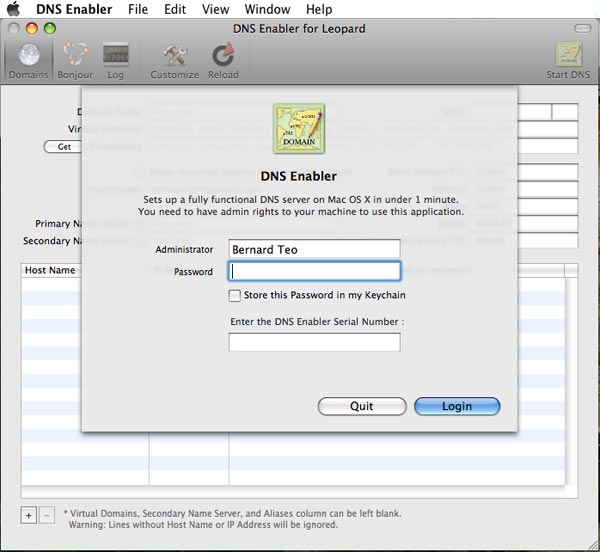
DNS Enabler for Leopard DNS Enabler allows Mac users to set up a fully-functional Domain Name Server on a plain Mac OS X machine with just one click. It is designed to allow a user to set up domain name information quickly using a single window, in the least amount of time. DNS Enabler provides the interface to allow users to specify name-to-address mappings, as well as their aliases. Additionally, it allows users to set the domain and zone information, like the Domain Name, Host Master's email address, and the Time-To-Live intervals that determine the validity periods for the domain information. It will generate the appropriate named.conf file, the forward mapping files for each domain, the reverse mapping files for each network, and all the resource and reverse pointer records for the user automatically from the specifications entered. New! DNS Enabler for Snow Leopard Introduction You can configure DNS Enabler using a non-admin account. Just provide either the full name or the OS X short name of an admin-level user and the administrator's password.
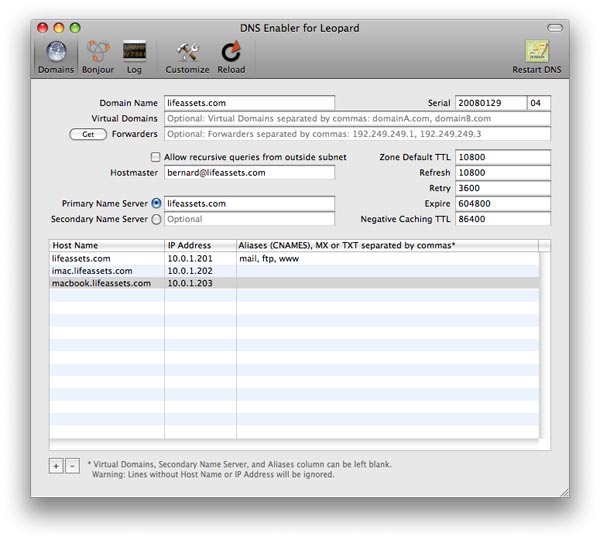
DNS Enabler now sports a customizable toolbar, containing three panels - the main DNS Enabler domain configuration panel (shown below), a panel to set up Bonjour Wide-Area Services, and a Log Panel showing the contents of the named.log. You can start, stop, and restart DNS services. And there is a button to reload the data with the settings currently in effect at the server. A Basic DNS Configuration for the Local Network Scenario : DNS Enabler on a private local network. You've set up a local network behind a router or a base station for testing or for doing web development.
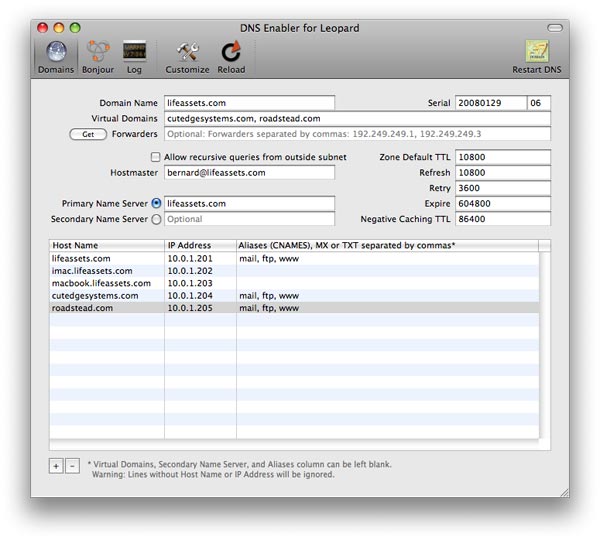
Let's say that the local network is on subnet 10.0.1.x and you've decided to have a web server, a mail server, and an ftp server on a static IP address 10.0.1.201, plus other servers on 10.0.1.202 and 203. To simulate real world conditions and not have to change your code when you move to a production environment, you want to access the servers via domain names, e.g., lifeassets.com, as shown above. So this is what you do. You run DNS Enabler on the 10.0.1.201 machine and set it up as shown. Important Note : On the machine that you're running DNS Enabler, in its Network Preferences, its DNS Server setting should always point to itself. You can now point all the other machines on the local network to use 10.0.1.201 as their name server (via the DNS Server setting in Network Preferences). This way then, all the local machines can now access the web, mail, ftp, and other servers via their domain names. If you've also set up aliases, you can also hit the web server by typing www.lifeassets.com into the browser. This is a simple thing to do and it takes only a couple of minutes to set up, but it can be made even more useful. For example, you may have a few other machines containing projects at various stages of development. You can switch your machines around and test each machine in turn as www.lifeassets.com, say, just by changing the name-address assignments in DNS Enabler. Or, since this is a private local network, you can simulate more than one domain, e.g., to test the effect of sending mail from one server to another, say, from roadstead.com to cutedgesystems.com. You can set up DNS Enabler as shown below :
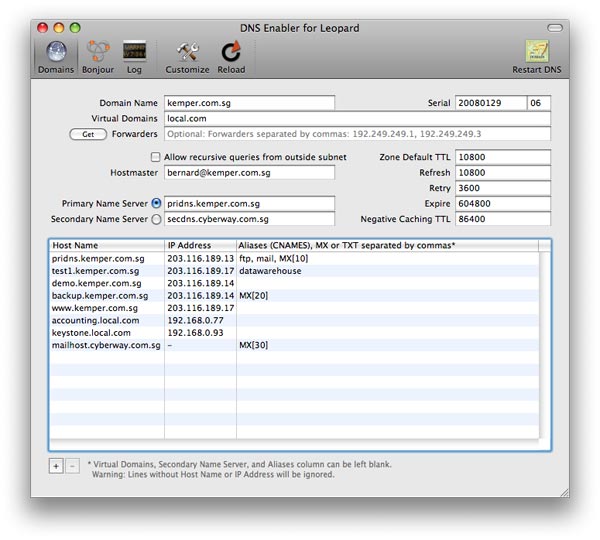
Another Scenario : This happens quite often - you may have set up a web or mail server behind a router, broadband modem, or wireless base station when you noticed that machines on the local network cannot "see" the server via its domain name, while machines outside the network can (e.g., you've used dyndns.org or some such service to obtain your own domain name). In this case, you can use DNS Enabler to broadcast the domain name to all the local machines (using the simple configuration outlined above) and help them find their way to your server. This has helped many MailServe users who are behind routers that don't know how to route outgoing packets back to an equivalent local IP address (that the public IP address is port-mapped to) and that are also hard to configure, to boot. Another benefit of running a DNS Server on the same machine as your web and mail server, in the way described above, is that your web and mail server will both "know" what their domain name is when they each start up (which they won't if you're running off a dynamic public IP address but sitting behind a router on a private network). This is crucial, for example, in making SSL work because, for SSL to work, three things must line up - the name the server knows itself by, the name on the SSL cert, and the name that people use to access the server. Also, the mail server, in particular, will be able to resolve domain names faster, to figure out where to send the mail, if it can refer to a dns server locally on the server machine without having to go out to an external DNS server, A Configuration for the Public Network Scenario : DNS Enabler on a public network. Introducing MX records. An example company, Kemper, has been given a range of 64 public IP addresses from 203.116.189.129 to 203.116.189.192. It sets its DNS server at 203.116.189.130 and gives it a name, pridns.kemper.com.sg. Its backup secondary name server is at the ISP, secdns.cyberway.com.sg. The machine that runs the name server is also the mail server and ftp server. Therefore, we give it the appropriate aliases, mail and ftp. We also add the label MX to indicate that pridns.kemper.com.sg, alias mail.kemper.com.sg, is providing the mail service for the domain kemper.com.sg. Note : If we have a host with the same name as the domain, and we run the mail server on this host, we won't need to use an MX record. If we have a secondary backup mail server among our machines, say at backup.kemper.com.sg, we can assign it by adding the MX label to that machine. The number in the bracket, as in MX[10] and MX[20], denotes the precedence.
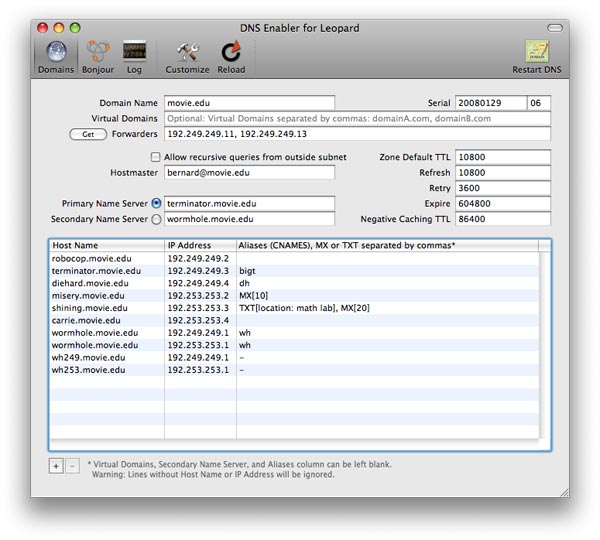
Across the firewall from the public network, the company runs a private local network (in the 192.168.0.x range). DNS Enabler can handle the setup of the name service for this local network within the same window. Because it is a private network, it can be given any domain name, which we enter into the Virtual Domains field. In our case, we use local.com, and we have two servers, accounting.local.com and keystone.local.com, that are used (and seen) only by the local users. MX records : If our ISP provides us with a backup mail server in case our whole domain is down, we can specify this backup mail server, as in the example above (with its IP number denoted by a dash - since we probably wouldn't know its physical address) : This is how our MX records will be ordered : kemper.com.sg IN MX 10 pridns.kemper.com.sg. Advanced Configurations The following screenshot shows DNS Enabler handling the data entry for the domain described in Paul Albitz and Cricket Liu's DNS and BIND book. It shows computers on two networks, 192.249.249.x and 192.253.253.x, for the domain movie.edu, with the router between the two networks at 192.249.249.1 and 192.253.253.1. The router is given the name wormhole.movie.edu, alias wh.movie.edu and serves as a backup for the primary name server terminator.movie.edu while providing the name service for the 192.253.253.x network. [Download the configuration, here, and open it in DNS Enabler].
Two other computers have aliases - terminator.movie.edu, which is known as bigt.movie.edu, and diehard.movie.edu, also known as dh.movie.edu. wh249.movie.edu and wh253.movie.edu are private interface-specific names used by the administrators and the dashes in the Alias column signals to DNS Enabler not to create reverse pointer records for them in the zone file. In the example above, DNS Enabler should be installed on the machine named terminator.movie.edu, which is the primary name server for the domain movie.edu. When you hit the Start DNS button, DNS Enabler will read in the name-address mappings, start up name services so that other computers can get answers to these name-address queries, and keep these running across reboots. DNS Zone Files This is the zone file created by DNS Enabler for the above configuration: $ORIGIN . DNS Enabler will also create the reverse pointer records. What about MX Records, TXT Records, and Forwarders? The following picture shows how you would handle MX and TXT records and Forwarders for the domain movie.edu :
misery.movie.edu and shining.movie.edu are the mail servers for the domain movie.edu, with misery.movie.edu ranking higher in priority as the target to receive mail for the domain. The mail exchanger role that both of these machine perform are denoted by the MX[xx] notation. You can leave a note that shining.movie.edu, the backup mail server, is located at the math lab by adding a TXT[string containing a description] label to the shining.movie.edu record. There is a new spam-fighting movement involving the use of SPF records (SPF = Sender Policy Framework). These are used in conjunction with TXT records kept at your DNS Server. In this case you would add a TXT[v=spf1 a mx ~all] record to the machine acting as your site's mail server. Forwarders are useful if you need to shunt name resolution to a particular name server. e.g., to keep off-site search for domain name resolution to a minimum to improve network traffic. In the example above, 192.249.249.11 and 192.249.249.13 are the site's forwarders, and you list them in the Forwarders field, separated by commas. DNS Enabler can auto-populate the Forwarders field based on the DNS Servers list that the user has set up in his Network Preferences. Just click the Get forwarders button. The configuration, above, can be downloaded from here. The zone file that DNS Enabler produces from that configuration is shown below : $ORIGIN . Setting up a Secondary Name Server DNS Enabler also allows you to set up a secondary slave name server. In the example below, besides running DNS Enabler on the Primary Name server, terminator.movie.edu, you can also install it on a Secondary Name Server, wormhole.movie.edu. First, use the Save menu item in the File Menu on the Primary Name server, to make a copy of the configuration. Then copy this to the machine that will act as the Secondary Name Server (in our case, wormhole.movie.edu). Run DNS Enabler on this secondary machine, and use it to open the configuration you've just copied over. Then click on the radio button next to the label "Secondary Name Server" :
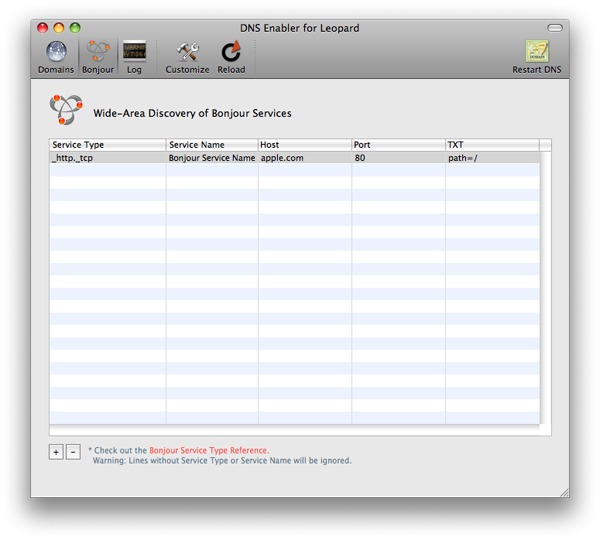
When you hit the Start/Restart DNS button, wormhole.movie.edu will now run in slave mode. Make a change to the primary server (terminator.movie.edu in our example) and you will see the change propagate to the slave when you hit its Reload (Current Data) button. The Start/Restart DNS button is then disabled in the slave to prevent you hitting it again. Network Notes : You need to make sure that the network set up is correct, i.e., both servers must be able to access (or "see") each other. Also, on each machine that you're running DNS Enabler, make sure that its DNS Server setting in Network Preferences points to itself. Use the Reload button in the slave to always see the latest state of the master. You can activate the Start/Restart DNS button again, if you decide to set this server up as a master some other time, by clicking on radio button next to the "Primary Name Server" label. DNS Enabler can also set up multiple secondary slave name servers. Just create a list of the slave servers' host names, in the Secondary Name Server field, and separate them by commas. Bonjour Wide-Area Services The Bonjour panel allows DNS Enabler to be used as a configurator for Bonjour services, to enable wide-area discovery of Bonjour devices :
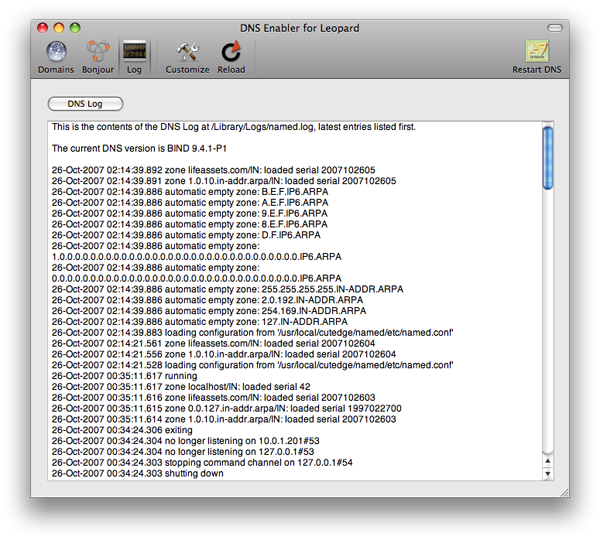
More information about the types of Bonjour services you can currently configure, and what you need to enter into the individual columns in the Bonjour panel, can be found at : http://www.dns-sd.org/ServiceTypes.html e.g., DNS SRV (RFC 2782) Service Types. What DNS Enabler saves the user is the need to know the specific syntax to set up SRV and TXT records at the DNS server. All he needs to know is the Bonjour service type, e.g., _http._tcp for publicising web pages (that may be served even from local private networks - you can use the Port number field to publicise a different port other than 80 and port-map that incoming request to a specific local machine) and the domain that will serve that request. The service name is a label that will show up in the Bonjour menu in, say, Safari. And the TXT column contains the path to that specific web page. (The TXT column stores different things for different services. See the cited Bonjour reference). The Log Panel The Log Panel shows the contents of the DNS Server log file at /Library/Logs/named.log, in reverse order, with the latest entries listed first. It also shows the current version number of the name server.
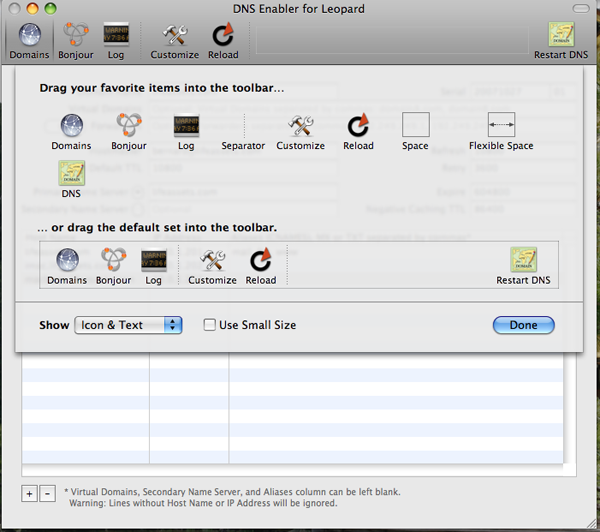
The Customization Panel The Customization Panel allows you to re-arrange the DNS Enabler toolbar. For example, if you don't use Bonjour, you can hide the Bonjour button and, consequently, the Bonjour panel.
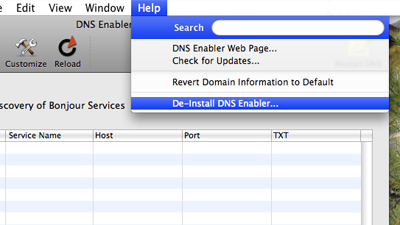
De-Installing DNS Enabler You can de-install DNS Enabler by using the menu item, shown below, in the Help menu. It will shut down the DNS Server, if it is running, and remove all files installed by DNS Enabler. DNS Enabler for Leopard works from its own folder in /usr/local/cutedge/named, in which are stuffed the named.conf and the db files used by DNS Enabler. The original /etc/named.conf and /var/named files are left un-touched by DNS Enabler and so DNS Enabler leaves your system in its original state after de-installation.
The Help menu also contains links to the DNS Enabler for Leopard web page and it can be used to check that web site for new versions. |
Snow Leopard Notes: |
||
|
We build commercial-quality software at shareware prices. DNS Enabler for Tiger serial numbers don't work on Leopard. Please support our work by purchasing a serial number for DNS Enabler for Leopard.
PayPal will accept all credit cards. But, if you're already a PayPal user and elect to pay by credit card, you'll need to use an alternate email address that isn't linked to your PayPal account. The serial number will be displayed in the browser after payment is completed, and also sent via email. Download: This is a Universal Binary. Please read the Release Notes Version 3.0.1 fixes a bug with the DNS Log button in the Log Panel, which had caused DNS Enabler to hang when the size of the log file got too big. Version 3.0.2 - systems that were upgraded to Leopard, instead of being clean-installed, may have some DNS-related launchdaemons left over from the Tiger install. DNS Enabler for Leopard now disables them if it finds them active while starting up. Version 3.0.3 - Leopard uses BIND version 9.4.1-P1, whch is set up by default to disallow recursive queries from outside the subnet that the server is on. DNS Enabler now allows the user to change this behaviour. Version 3.0.4 - fixed the config file to work with Apple's latest BIND 9.4.2-P1 update. Eliminates the "using specific query-source port suppresses port randomization and can be insecure" warning.
New ! Check out MailServe Pro, now with Dovecot :
|
|||