|
|||
| MailServe for Yosemite MailServe helps you set up a fully functional mail server on Mac OS X that can: • send outgoing mail MailServe organises each of these tasks—from the simple to the complex—into discrete panels in its user interface. This allows the user to turn the mail services on one-by-one, and turn them off individually when they're not needed. MailServe does a lot of complicated configuring of your server beneath its Mac-like user interface. It does this in a non-invasive manner, touching as little as possible of the original system files so as to leave your system in its pristine state. And you can remove all the files installed by the MailServe, at one go, using the De-Install option in MailServe's Help menu. Upgrade Notes, if you’ve used MailServe before and didn’t do a clean install of Yosemite: Once you have launched the latest version of MailServe, save the current config using the File->Save menu item, do a De-Install from the Help menu, which removes all the previous cruft, and then quit and come back to the app. You'll then get the config files, libraries and the other stuff that will work with Yosemite.
Step 1—Sending Mail to other Mail Servers, using the Outgoing Panel Mail servers talk to each other via SMTP. There's an SMTP server, Postfix, built into every Leopard machine. But it needs to be turned on. So, start at this point—at MailServe's Outgoing panel—to turn on that SMTP server. Once it's on, you can use it to send mail to other mail servers, as well as from things like PHP scripts, running on your server. [Details] Step 2—Receiving Mail from other Mail Servers The Postfix SMTP server will also receive mail from other servers. But you need to first tell Postfix which domains to receive mail for. You set this up using the Mail Server panel, which also allows you to set up Postfix so it will relay mail for other machines on your network, as well as for remote machines which authenticate. [Details] Step 3—Setting up POP3 and/or IMAP Servers using Dovecot Once Mail has been delivered to the Postfix server, you need to have a mechanism whereby mail clients like Mail, Entourage or Thunderbird can access the stored mail. This service is provided by POP3 and IMAP server called Dovecot, not Postfix. IMAP servers have an additional functionality over POP3 servers—they allow the user to organise the messages into a folder/subfolder structure. [Details] Step 4—Setting up Fetchmail Fetchmail is useful for people who have many other POP or IMAP servers that they read mail from. Fetchmail can be set up to check these other POP or IMAP servers periodically and download all that mail, consolidating them into one single mailbox on the local server. [Details] Step 5—Spam Filtering & Mail User Accounts Management The Spam Panel includes controls for managing spam and setting up user accounts. MailServe uses procmail to integrate Postfix with Dovecot and SpamBayes to implement spam filtering. The mail administrator can set up custom procmail directives to be processed before or after spam processing. [Details]
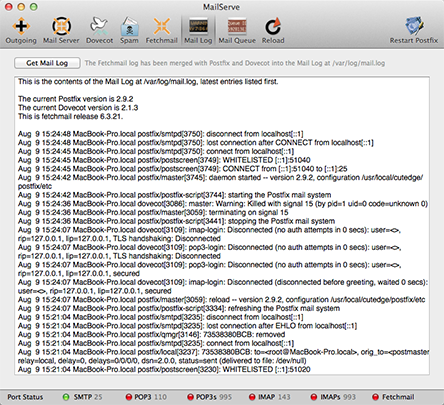
The Mail Log Panel provides access to the Postfix, Dovecot and Fetchmail logs as one merged stream. It also shows the current versions of Postfix, Dovecot and Fetchmail that's activated by MailServe.
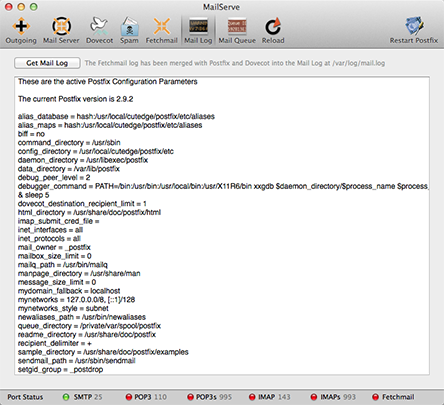
If you Option-click the Postfix Log button, you can get a list of the currently active Postfix parameters.
Use this panel to monitor the mail queue. The Get button retrieves information about messages in the mail queue. You can flush the queue or choose a particular message to delete—useful for when there are messages stuck in the queue.
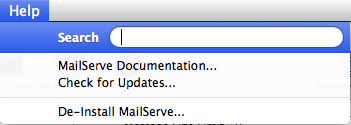
You can de-install MailServe by using the menu item, shown below, in the Help menu. It will shut down any mail-related service that is still running, and remove all files installed by MailServe.
MailServe works from its own folder in /usr/local/cutedge/postfix, in which are stuffed the main.cf, master.cf and other files used by Postfix. The original Postfix files in /etc/postfix are left un-touched and so MailServe leaves your system in its original state after de-installation. 8.0 October 20th 2014. MailServe for Yosemite released. 8.0.1 October 21st 2014. Updated MailServe for Yosemite with the latest versions of Dovecot, version 2.2.14. Fetchmail is still on 6.3.26+SSL, which is still the latest version. The Postfix version is 2.11.0. Users of the original 8.0 release of MailServe for Yosemite can get these latest binaries by doing a De-Install from the Help menu. Save your config first using the File menu. Then after doing the De-Install, quit and come back to MailServe, open your saved config, and then restart all your mail services. You’ll be running the latest Dovecot. |
The serial number & download link will be displayed in the browser after payment, and will also be sent via email.
Please provide the email address you used to purchase the product, together with its serial no: The latest MailServe for Yosemite version is 8.0.1 For more details, please check out the Release Log.
|
||