|
|||
|
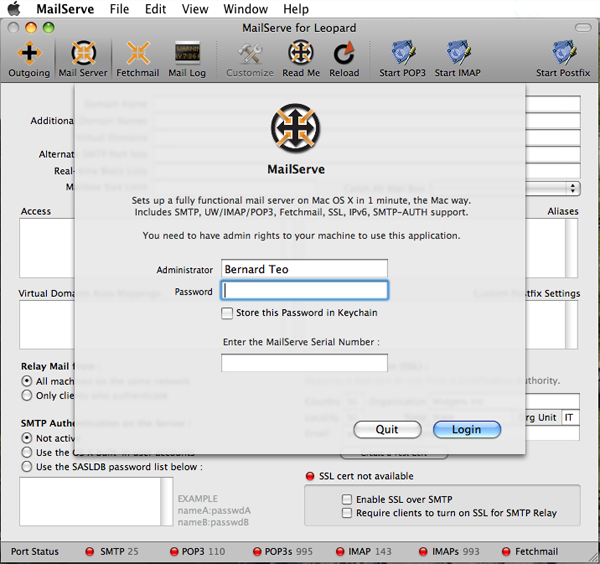
MailServe for Leopard MailServe sets up a totally buzzword-compliant mail server on Mac OS X, the Mac Way. It sets up SMTP, UW/IMAP & POP3, and Fetchmail services, including support for SSL and SMTP authentication. Note: If you need support for nested IMAP sub-folders, you'll need to use Dovecot rather than UW/IMAP (which only supports one level of IMAP folders). Please check out MailServe Pro, which includes a one-click install of Dovecot. New! MailServe for Snow Leopard. Introduction MailServe can now also be configured from a non-admin account. Simply provide either the full name or the OS X short name of an admin-level user and the administrator's password.
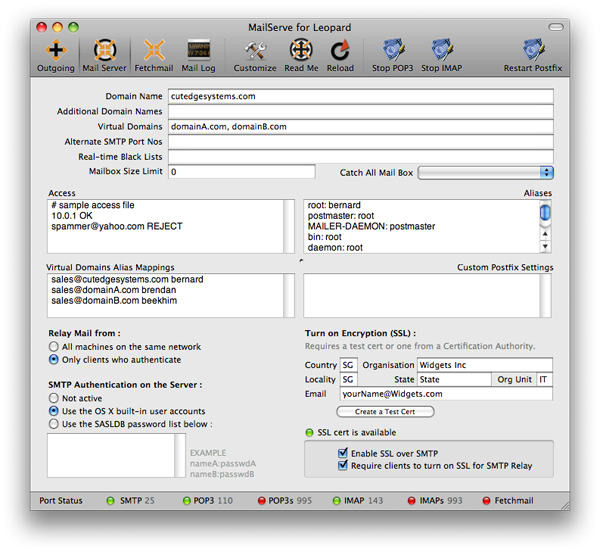
MailServe's customizable toolbar includes panels for setting the outgoing SMTP server parameters, the full mail server preferences, Fetchmail settings (if needed), and access to the mail log. There are separate buttons for turning on POP3 and IMAP, with or without SSL, in case there is a need for enforcing SSL-only connections from mail clients. There is also a new Port Status bar at the bottom of the window, to give a visual indication as to whether MailServe has successfully opened up the relevant ports for listening to connections. The Outgoing Mail Panel Click the Start Postfix button on the toolbar to turn on Mac OS X's built-in SMTP server. This will allow you to send mail out the command line, from PHP or Perl scripts, or from mail client applications like Mail, Eudora or Entourage. If Postfix has been successfully started, its toolbar button changes its label to Restart Postfix, and the Port Status bar lights up for SMTP port 25. You can always Stop Postfix by option-clicking on the toolbar button.
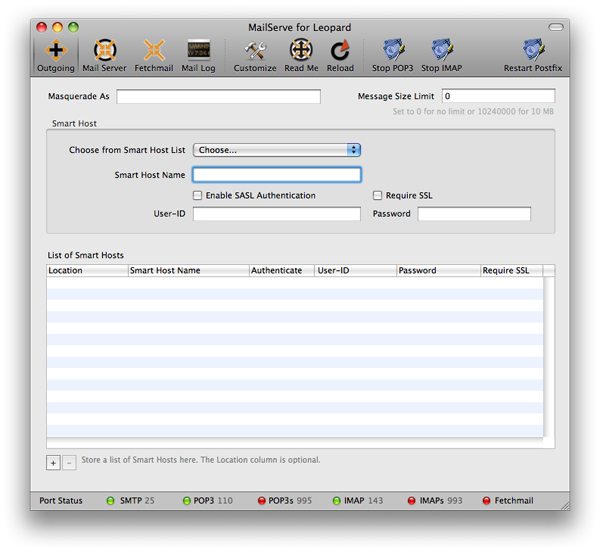
Using the other fields in the Outgoing Mail Panel If your ISP blocks port 25 and requires you to go through their own SMTP server (what is called a Smart Host), enter their SMTP server name into the Smart Host Name field (otherwise leave it blank). Your built-in Postfix SMTP server will then contact this Smart Host and relay mail through it. Note : if the Smart Host needs to be contacted on a port other than 25, add the port number after the Smart Host name, after a colon. Like this : mail.singnet.com.sg:587 In addition, if your ISP requires you authenticate against its Smart Host, turn the Enable Authentication check-box on and provide the user-id and password combination given by your ISP, as shown in the example below :
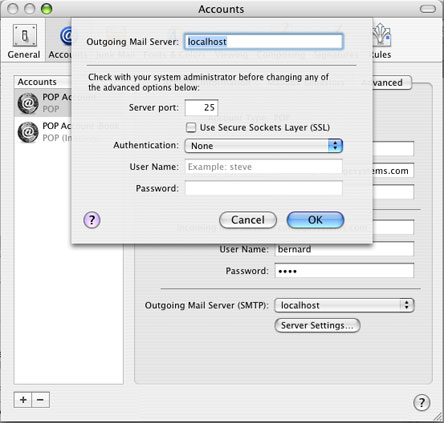
Note : if the Smart Host needs to be contacted on a port other than 25, add the port number after the Smart Host name, after a colon. Like this : smtp.earthlink.net:587 If your ISP requires that you connect to their SMTP server over SSL, turn the Require SSL check box on. After you've made any of these changes, click the Restart Postfix button to effect the change. Then test that you can now send mail out your ISP network, by sending mail out via the command line, PHP or Perl script, or from a mail client like Mail or Eudora. Make sure that the port status light for SMTP is green. If you do get a connection and can send mail out, you might like to add a couple of other refinements. If you want your message to look like it's being sent from a particular domain (and avoid the "May be forged" headers that some ISPs' servers tag onto it), enter that doman name into the Masquerade As field. The Masquerade As field is particularly important for PHP programmers using PHP's built-in mail function. Enter a domain name into the Masquerade As field that corresponds to to the e-mail address that you want all replies to come back to, and you will find that your messages will get to their destination safely from the PHP scripts. Without this, the messages will get rejected. The last field on this panel is the Message Size Limit. Set to 0 for no limit. If you need to keep a list of Smart Hosts, for when you are on different networks or locations, store them in MailServe's Smart Host list. You can pick them up in the popup menu when you're setting the Smart Host. For developers - the benefits of having your own SMTP server For PHP programmers, web designers, and other software developers, it's often useful to set up a local SMTP server on the development machine and communicate with it through "localhost". This is because you can let the local SMTP server do the job of communicating with a Smart Host, or set up the SSL connections, if required, or work with the DNS System, without your having to figure out what to do to effect these in your code. In your code, you simply talk to "localhost" and leave it to the Postfix Enabled-SMTP server to do the rest. Setting Up Mail.app This is how you set up Mail.app to talk to the local SMTP server.
Set up the POP or IMAP account information the usual way, for the Incoming Mail Server. Set them to point to whichever mail server is providing the POP or IMAP services. You can use MailServe to set up POP and IMAP services so you can become your own ISP - see the topic concerning the Mail Server panel, below. To use use your own built-in SMTP server, set the mail client application's Outgoing Mail Server to either localhost or 127.0.0.1, as shown above, and that's it. Make sure that the Authentication pop-up menu is set to none because you don't need to authenticate with your own built-in mail server. In summary, this is what you're doing. You set up your POP or IMAP accounts so that replies coming back to you will reach you on your mail client. But the messages sent out your Mac via localhost will be despatched directly to the recipients. Note for MacBook users : You may like to know if a large attachment has been sent out your machine, so you can close your MacBook lid. Look into the Mail Log panel and check for a log entry that indicates Status=Sent for that particular message. Warning: If you're only going to send mail out and not intending to set up a full-fledged mail server (see next section), do not use the Mail Server panel because the settings for the two situations are slightly different. Specifically, do not enter a domain name into the Mail Server panel because that will cause Postfix to hold on to mail that are addressed to people on that domain, rather than sending them out. The Mail Server Panel MailServe can be used to set up a fully functioning mail server, complete with POP3, IMAP, and Fetchmail services. Workstations on the local network can use this server to relay mail to each other, as well as to send them out to the rest of the world. This section describes how you would set this up. First, make sure that you've already been able to send mail out successfully to other mail servers. If not, please review the earlier Outgoing Mail panel.
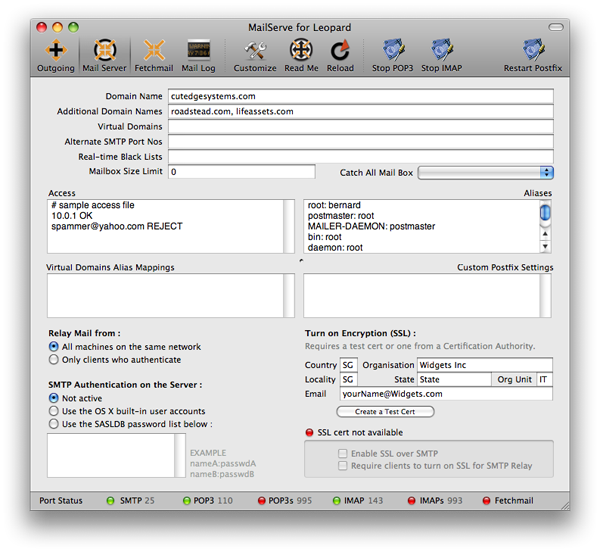
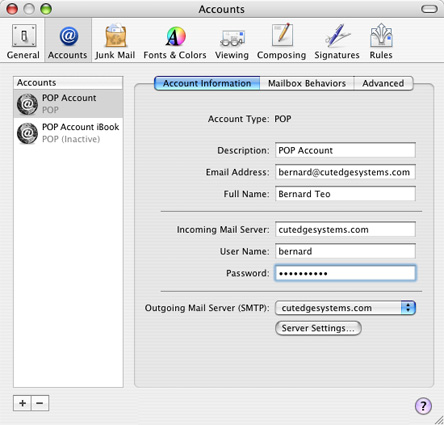
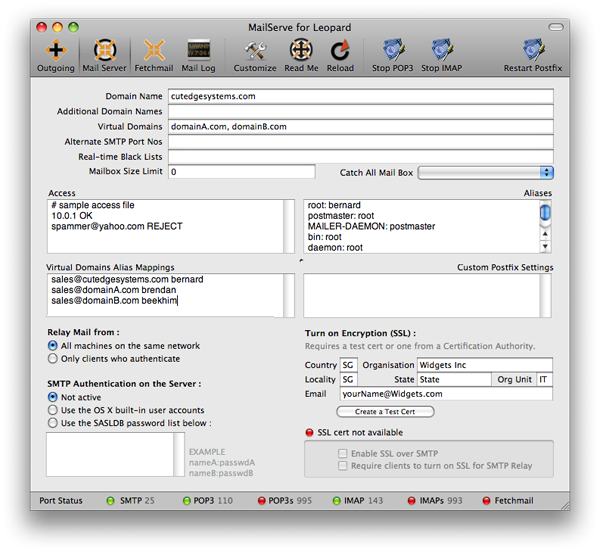
Make sure you have a valid domain name and that it is pointing correctly to your server machine. If it is, enter it into the domain name field. In the example above, my domain name is cutedgesystems.com. Once you've done this, click on Restart Postfix, and that's it. I've set up a mail server for the domain cutedgesystems.com and all machines on the same network as the server can send mail through it. Multi-domains Note : If you're able to serve out more than one domain on your server, you can tell your mail server to receive mail from those other domains by adding their names into the Additional Domain Names field. Please note : When you're setting up a mail server that is accessible by the rest of the world, you must have a valid domain name. Check out this tutorial if you want to try this out using a free domain name. You need to check that the domain name works. The simplest way to do this is to turn on the web server on the same machine you are using to run your mail server (using OS X's Sharing Preferences). Then, fire up a web browser, like Safari, and see if you can hit the web pages that you know you have on this machine. Setting up POP3 and IMAP Services It's important to realise at this point that you need to set up user accounts on the mail server to collect (and act as distribution points) for the in-coming mail. To create an account for a mail user, simply create a New User on that server machine using the System Preferences -> Accounts panel. Once you've created your user accounts on the server, you can choose between two different mechanisms that will allow your mail users to download their in-coming mail to whatever machine they happen to be using as their workstation. POP3 is a simple mechanism for transferring mail to a mail client software like Eudora, Mail.app, or Entourage. IMAP is a "smarter" system because you can use more than one machine to read your mail and the state of your mail box is synchronised across all these machines (in terms of the messages last read, state of drafts, etc.) You can set up both POP3 and IMAP services using MailServe and have both running at the same time, allowing your users to choose which service they prefer. So, next, you will need to enable either POP3 or IMAP services (or both) so that all the machines and users on your network can retrieve their incoming mail. Leave all the other settings alone and click on the Start POP3 or the Start IMAP button on the toolbar, depending on which mode of mail service you prefer to run. If the services start up correctly, their status lights turn to green and their button labels now show Stop POP3 or Stop IMAP, respectively. Check that it works Assuming that my domain name is cutedgesystems.com, this is how I'll set up the mail client, OS X's Mail.app, on each user's machine. Test it first on the local machine, i.e., the same machine you're using to run your server. Enter your domain name into your mail client's Incoming Mail Server and Outgoing Mail Server fields. The User Name and Password fields will correspond with the name and password of a user you had created using the Systems Preferences - Accounts Panel on the server machine. (If you've enabled the IMAP server, you can also use the Account Type: IMAP).
When you are ready, use Mail to send mail out to anybody you know and see if you can get a reply. The replies will come back to the same server. You can pick them up using Mail because MailServe has equipped your server with POP3 services. The Access Field The Access field can be used to blacklist individual mail senders from sending mail to your site, or even entire domains. spammer@yahoo.com REJECT It can also be used to stop mail from reaching a particular user account on your system, e.g., for a user that has since left the company : brendan@ REJECT Imagine that Brendan has left the company but he was subscribing to lots of mailing lists. The above setting in the Access field will bounce all mail for brendan back to the sender. Note : use brendan@ as a wild card setting, if you're receiving mail for more than one domain. If you want to specify that you want to block Brendan's mail for just one specific domain, use brendan@cutedgesystems.com REJECT. The Aliases Field Some required entries for Aliases are already created for you. Each site needs to have a Postmaster and a Root user so that other ISPs and you own system processes can contact a responsible person when they find problems with your system. MAILER-DAEMON is the conventional name attached to bounced messages. When senders find that their messages have bounced, they may need to contact someone for clarification. Their replies to their bounced messages will go to MAILER-DAEMON, so you need someone to pick these up. The first line in the example, below, shows that you can create e-mail groups quickly by entering a group name on the left-hand side of an Alias entry, and entering a series of user names, separated by commas, on the right-hand side, which can include users from other domains. nightrunner: haihwee,beekhim,brendan@sky.com The last line in the example, above, shows another way of creating e-mail groups - by pointing the mail server to a file that contains a list of e-mail addresses, with one address on each line. You can also send all mail destined for a specific user into the black hole : baduser: /dev/null The Catch All Mail Box - mail addressed to no valid user You can choose who, among your users, gets to be swamped by mail that cannot find a valid user on your server. If you elect not to nominate anyone, all these messages will be bounced back to the sender. Or sent into the black hole, if you choose /dev/null in the popup menu. The Additional Domain Names Field If your server hosts more than one domain, you can list the additional domains in this field (separated by commas) so that Postfix knows that it has to accept messages sent to these domains. Make sure that these domain names work first and that they're also pointing correctly to your server machine. Ordinarily, there is no separation between users into particular domains. For example, on my server, mail for bernard@cutedgesystems.com and mail for bernard@roadstead.com will both reach me in my single mail box on the server, under the user name bernard. To get mail for sales@cutedgesystems.com and sales@roadstead.com sent to two different mail boxes, see the Virtual Domains example, below. Relay Mail From - all machines on the same network or only clients who authenticate This option allows you to prevent your Mac acting as an open relay if you've placed it directly on a broadband line. The default setting is to allow all machines on the same subnet as the server to relay mail through it without needing to authenticate, which is convenient for getting a shared server up quickly. But if you've placed the server directly on a broadband or dial-up line, then you will have all machines sitting on your ISP's network becoming your local network, inadvertently creating an open relay. Clicking on the "Relay Mail From : only clients who authenticate" choice will close up the open relay. If you need to still allow mail relay from known users, turn on authentication. This will be the safest option. The Custom Postfix Settings field This is meant to allow experienced Postfix users to add their own modifications to the Postfix configuration that have not been taken care of by the MailServe user interface. These will not be over-written when you do a Restart Postfix. The Mailbox Size Limit field Set to 0 for no limit, which may be useful for people running Fetchmail. The default is about 50 MB. The Alternate Port Numbers (for SMTP) field This allows the server administrator to open more ports (beside port 25) for mail clients to contact it. For example, it may be useful to add port 2525 (and also 52525, separated by a comma). This way, if your users happen to be on a network that blocks outgoing mail from using port 25, your users would still be able to relay mail out your server by switching their mail clients to use either port 2525 or 52525. You can also use this field to open more ports for other mail servers to contact your server, to deliver mail to it. For example, you may be attempting to set up a mail server on a network whose ISP blocks incoming port 25. This way, no other mail servers will be able to deliver mail to your server. There is a way around this, that people using DynDNS.org's MailHop feature (for example) have expoited. But you need to open an alternate port that MailHop can use to contact your server (check the dyndns.org example). Set this port number in MailServe's Alternate Port Numbers (for SMTP) field. The Real-time Black List (RBL) field This field allows you to list RBL (Real-Time Black Lists) sites that you want your server to check against. If you have more than one, you should separate them by commas. Such sites include bl.spamcop.net, sbl-xbl.spamhaus.org, cbl.abuseat.org, etc... You can choose from among a lot more if you search Google. The Virtual Domains field & Virtual Domains Alias Mappings field Ordinarily, even if you receive mail for two domains - domainA.com and domainB.com - sales@domainA.com will use the same mailbox as sales@domainB.com. But, using the Virtual Domains field, you can make things work a bit differently. You need to create two separate user accounts on the server first, say, brendan and beekhim, respectively. Then make sure that the two domains, domainA.com and domainB.com, are listed in the Virtual Domains field. Then you can use the Virtual Domains Alias Mappings field to point sales@domainA.com to brendan's mailbox and sales@domainB.com to beekhim's mailbox, as shown below :
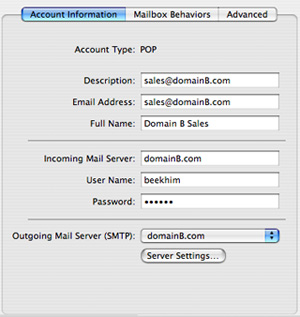
Note that you can also add an entry for sales for the primary domain (i.e., sales@cutedgesystems.com, above) and point it to another mailbox (i.e. user account) on the server. This is how you manage the sales@domainB.com account using Mail.app :
The messages for sales@domainB.com will go to the mailbox of the real user, beekhim, on the server. SMTP Authentication This allows the mail server to be accessed remotely only by authorised users, whose name:password combinations have been registered with the server. By default, machines on the local network need not authenticate to send mail through the server. You can force everybody to authenticate (by choosing the "Relay Mail from : Only clients who authenticate" option). This is especially important if you've placed your server directly on the broadband line, instead of behind a router or Airport Base Station, in which case all the other machines on your ISP's network becomes your "local" network! The safest practise is to turn on SMTP authentication, as shown below.
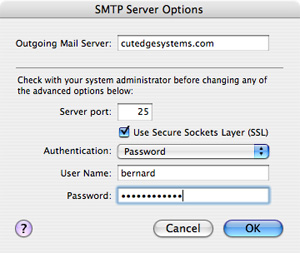
If you need to turn on SMTP Authentication, you have two choices - use the built-in OS X user accounts or SASLDB. The first method is so simple to use. It authenticates against the Mac's built-in user account management - so you maintain just one set of passwords, using System Preferences. Turn it on and you're done. (But the downside is that passwords are sent in the clear, unless you turn on SSL encryption, as shown below and explained in the SSL section.) In Mail.app, under Outgoing Mail Server, click on Server Settings and set up the SMTP Server Options, as shown below. You need to make sure you enter the same User Name and Password combination that you gave to this user, using the server's OS X System Preferences panel :
The second method, SASLDB, is considered to be more secure because passwords are never sent down the wire, only tokens. If you choose to turn on SMTP Authentication via SASLDB, you will need to provide the server with a list of username:password combinations, for each user who will be needing to send mail remotely through the server. In Mail.app, under Outgoing Mail Server, click on Server Settings and set Authentication to "MD5 Challenge-Response". Enter the username:password combination that was registered for this user on the server.
SSL (Secure Sockets Layer) You can turn on or off SSL mode to encrypt the communications between client and server, over SMTP, POP, and IMAP. However, you will need to have the appropriate SSL certs in /System/Library/OpenSSL/certs before you can enable SSL. You can create test (self-signed) certs to test the SSL connection to and from the mail server. You can always replace them with "real" certs, of the same name, in the future.
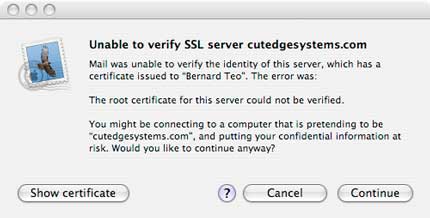
You can require SSL be set in the mail client before your server will agree to relay mail for it. Just check the Require SSL option. If you're testing the SSL connection, make sure you quit Mail.app and come back in again, when you switch the server from non-SSL to SSL mode. This is important, and had been the source of quite a few support calls. Mail.app seems to cache the information it keeps about a connection. If you switch modes, in mid-stream, it may get confused and you will see a connection error until you quit Mail.app and come back in. Also, if you're using the self-signed test certs, you will see the following dialog box thrown up by Mail.app, when you first send mail over SSL :
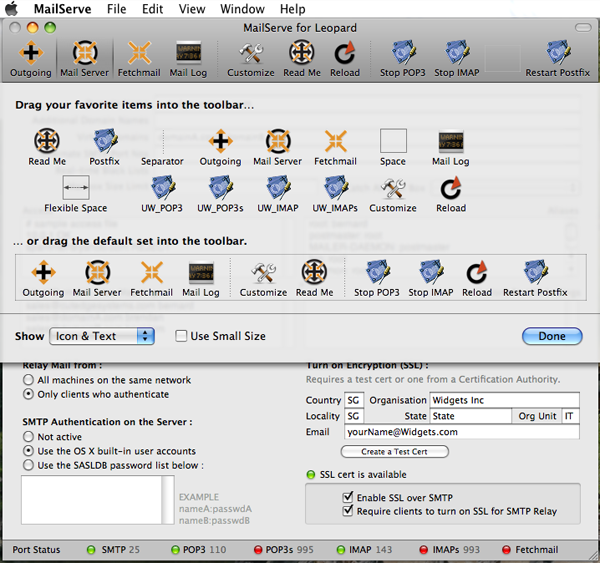
This is OK. It shows that the SSL mode is working. The cert used is a self-signed cert that hasn't been verified by any of the known certification services, e.g., Verisign. The cert can still be used to enable SSL encryption between client/server communications. If you click on "Show Certificate", it will show you the data you have set for this certificate (if you've updated the Country/State/Locality fields before clicking on the "Create SSL Test Certs" button. You can always replace the test certs with "real" certs of the same name. They are stored in /System//Library/OpenSSL/certs. There is one way to get rid of this dialog box. Click on the Show Certificate button. Drag the certficate icon that you'll see in the top left hand corner of the extended dialog to the Finder. This will create a file and you double-click on it. This will launch the Keychain Access application. Choose X509 Anchors when you're presented with a popup menu. Then import that certificate into the Keychain. SSL for POP3 and IMAP MailServe for Leopard now allows you to require all mail clients to turn on SSL when accessing their POP3 or IMAP mailboxes. This is implemented through having separate buttons for turning on SSL mode for POP3 and IMAP. You can find these buttons by clicking on the Customize function in the toolbar :
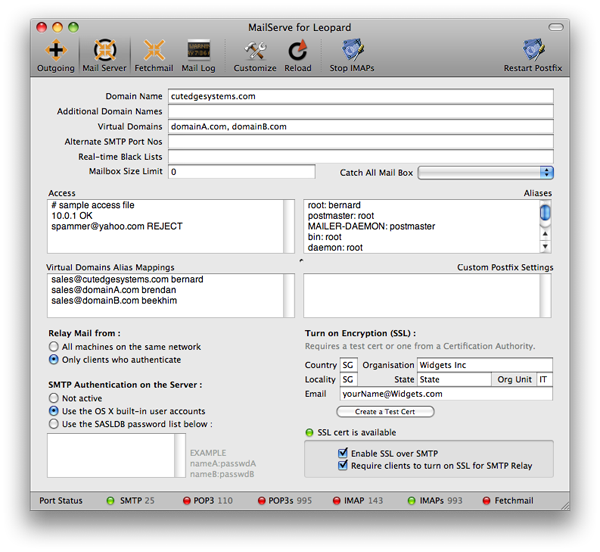
You can move buttons on or off the toolbar, depending on whether you have use for their functionality. The picture below shows the case where the user only wants to implement IMAP over SSL :
This allows you to keep the MailServe interface clean and sparse, showing only the functioons that you do intend to use. The Fetchmail Panel Fetchmail is useful for people who have many other POP or IMAP servers that they read mail from. Fetchmail can be set up to check these other POP or IMAP servers periodically and download all that mail, consolidating them into one single mailbox on the local server. This is a good reference site for Fetchmail (the official man page) :-
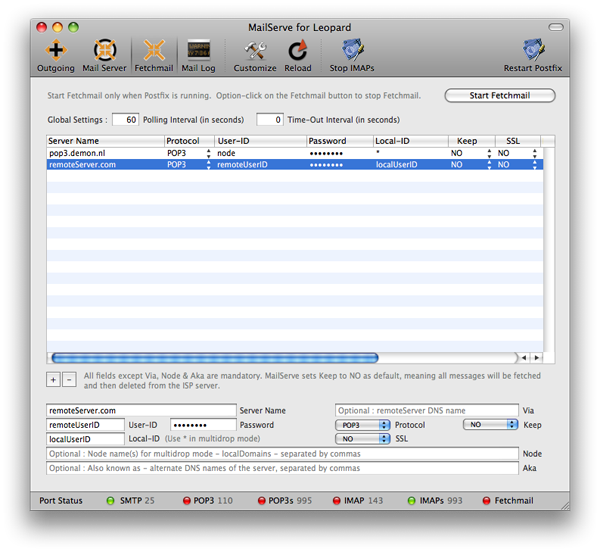
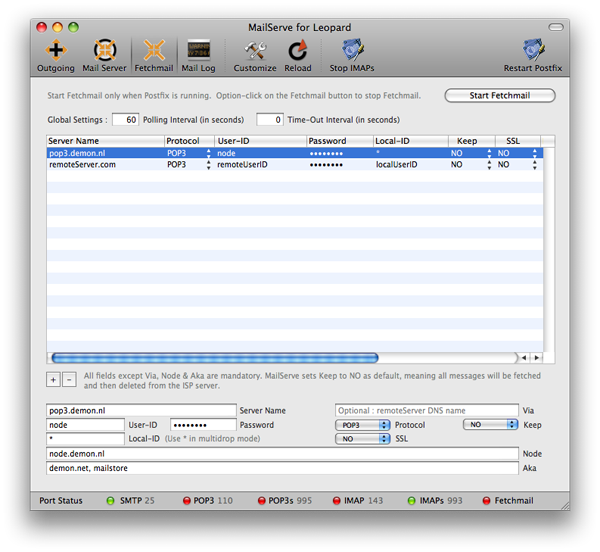
To set up Fetchmail, go to the Fetchmail tab, click the + button to add a POP or IMAP server to fetch mail from, enter the server name, choose the protocol, e.g., POP3 or IMAP, enter your user ID and password at this server, and your user name on your local server. Leave the Keep column as NO to fetch all messages from the server and delete them after downloading. If you set Keep to YES, then they're left on the server, but Fetchmail attempts to figure out which messages are new and tries to download only the new ones. If this doesn't work well, leave Keep as NO. Leave SSL to NO, unless your ISP requires the connection to be over SSL. If you know that the ISP server is a POP3 server, it helps to set the protocol explicitly to POP3 rather than to leave it as AUTO. The default polling interval is one minute and the default time-out is 45 seconds. Set to 0 for no timeout, though this is not recommended. The Via field is optional. It can be made to contain the DNS name of the ISP POP or IMAP server. If set, this will override the Server Name field. Now why would you want to do that? You may have several accounts polling the same ISP mail server. If you enter the ISP server name into the Via field rather than the Server Name field, you can use the Server Name field merely as a label, a descriptive name for each account set-up. The Via field is optional. It's for people whose existing Fetchmail setup already uses a Via parameter. You can choose to ignore it if you want. Leave the Node and Aka fields empty, unless you want to set up Fetchmail to work in multi-drop mode whereby mail from one single mailbox at the ISP server is split by Fetchmail into multiple mailboxes at the local server. Fetchmail in Multi-Drop Mode Typically, multi-drop mode works this way. The ISP provides you with an account or node on the server, say node.isp.net. Your web server is at www.node.isp.net and you can get mail delivered to user1@node.isp.net, user2@node.isp.net, etc... When you need to read those mail, you log in to the ISP server as user name "node" and give your password. But user1 and user2's mail are all in the same mailbox. What you want to do is to get Fetchmail to do the logging on for you, and download all those mail, but split them into individual mailboxes that you have created on your own server for user1 and user2, etc. Then your users will log onto your local server and read their mail (coming down from isp.net) as if these had been sent to the local server all along. Fetchmail in multi-drop mode needs a couple of hints to help it on its way.
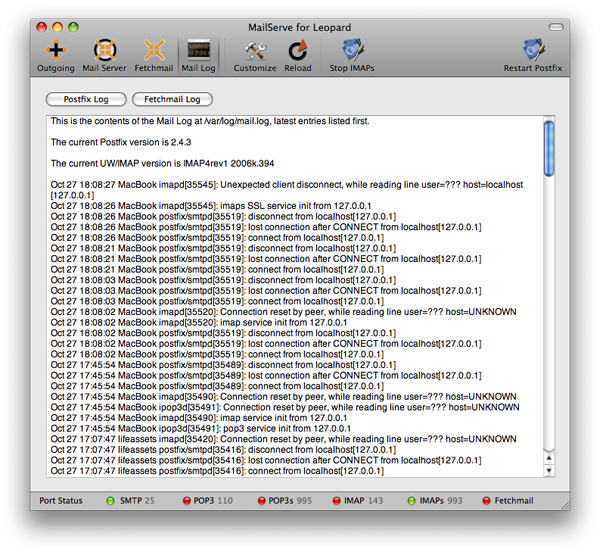
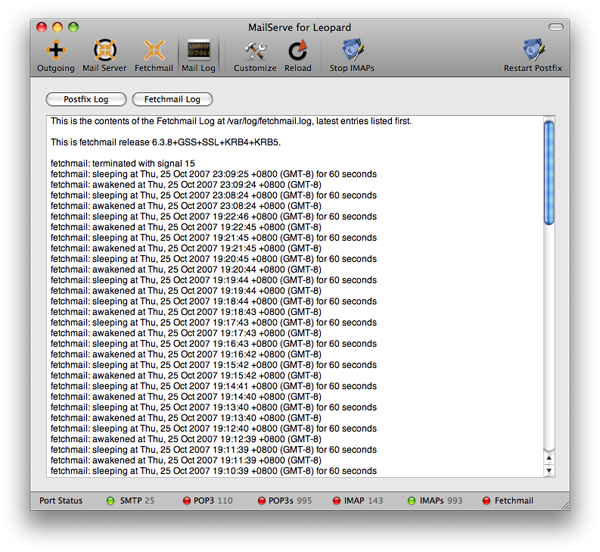
First, you will need to enter the node name into the Node field. In Fetchmail parlance, this would be the localdomains parameter. In our example, we will enter "node.isp.net" into the Node field, i.e., the right hand side of the @ sign in the email addresses you've been given by the ISP. Then you may need to enter the other names that the ISP POP or IMAP server is known by into the Aka field. You can find this out by doing a "dig +short MX pop.isp.net" in the Terminal, where pop.isp.net is replaced by the POP or IMAP server you need Fetchmail to download the mail from. By giving more information about what likely names the ISP mail server may be known by, it can help Fetchmail figure out, from the mail headers, where each message should be delivered to on the local server. To start Fetchmail, click on the Start Fetchmail button the top right-hand corner of the panel. Make sure that the Fetchmail status light turns green. If not, check the Fetcmail log in the Mail Log panel for clues as to what could have gone wrong. If Fetchmail starts up corectly, its button label will read Restart Fetchmail. You can Stop Fetchmail by option-clicking on it. The Mail Log Panel The Mail Log Panel provides access to the Postfix Log, below :
as well as the Fetchmail Log :
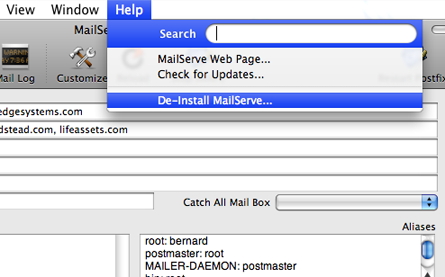
Both logs show the most recent entries first, and display the currently running versions of their respective servers. If you option-click on the Postfix Log button, you can get a list of the currently active Postfix parameters set up by MailServe. The Mail Server and the Leopard Firewall You should check your mail server machine to see if you have Leopard's built-in firewall turned on. I do not yet know of a good way to set up the firewall because that function seems to have taken a couple of steps backwards with Leopard. In any case, if you find an appropriate Firewall software for Leopard, you should open, at least, ports 25 (smtp), 110 (pop3) and 143 (imap) in the firewall. If you've turned on SSL, you should also make sure ports 995 (pop3 over SSL) and 993 (imap over SSL) are opened. De-Installing MailServe You can de-install MailServe by using the menu item, shown below, in the Help menu. It will shut down any mail-related service that is still running, and remove all files installed by MailServe. MailServe for Leopard works from its own folder in /usr/local/cutedge/postfix, in which are stuffed the main.cf, master.cf and other files used by Postfix. The original Postfix files in /etc/postfix are left un-touched and so MailServe leaves your system in its original state after de-installation.
The Help menu also contains links to the MailServe for Leopard web page and it can be used to check that web site for new versions. |
Snow Leopard Notes: |
||
|
We build commercial-quality software at shareware prices. MailServe/Postfix Enabler for Tiger serial numbers don't work on Leopard. Please support our work by purchasing a serial number for MailServe for Leopard.
PayPal will accept all credit cards. But, if you're already a PayPal user and elect to pay by credit card, you'll need to use an alternate email address that isn't linked to your PayPal account. The serial number will be displayed in the browser after payment is completed, and also sent via email. Download: This is a Universal Binary. Release Notes Version 3.0.1 fixed a bug with the Postfix Log button in the Mail Log Panel, which had caused MailServe to hang when the size of the log file got too big. Versions 3.0.2 & 3 - systems that were upgraded to Leopard, instead of being clean-installed, may have some mail-related launchdaemons left over from the Tiger install. MailServe for Leopard will now try to disable them if it finds them active while starting up. Version 3.0.4 - figured out how to get the Mail Queue feature working again in MailServe for Leopard. You can find the button that displays the Mail Queue panel when you Customize the Toolbar.
Check it out today!
|
|||